Despite how army for the liberation of rwanda technology has moved in holocene years, the prospect of having a personal automaton supporter is even not a reality, and that ’ s a actual shame !
You may not be able to own a real robot, so the next best thing is drawing a automaton friend for yourself !
If you don ’ triiodothyronine know how to go about this, though, then we have the lead for you !
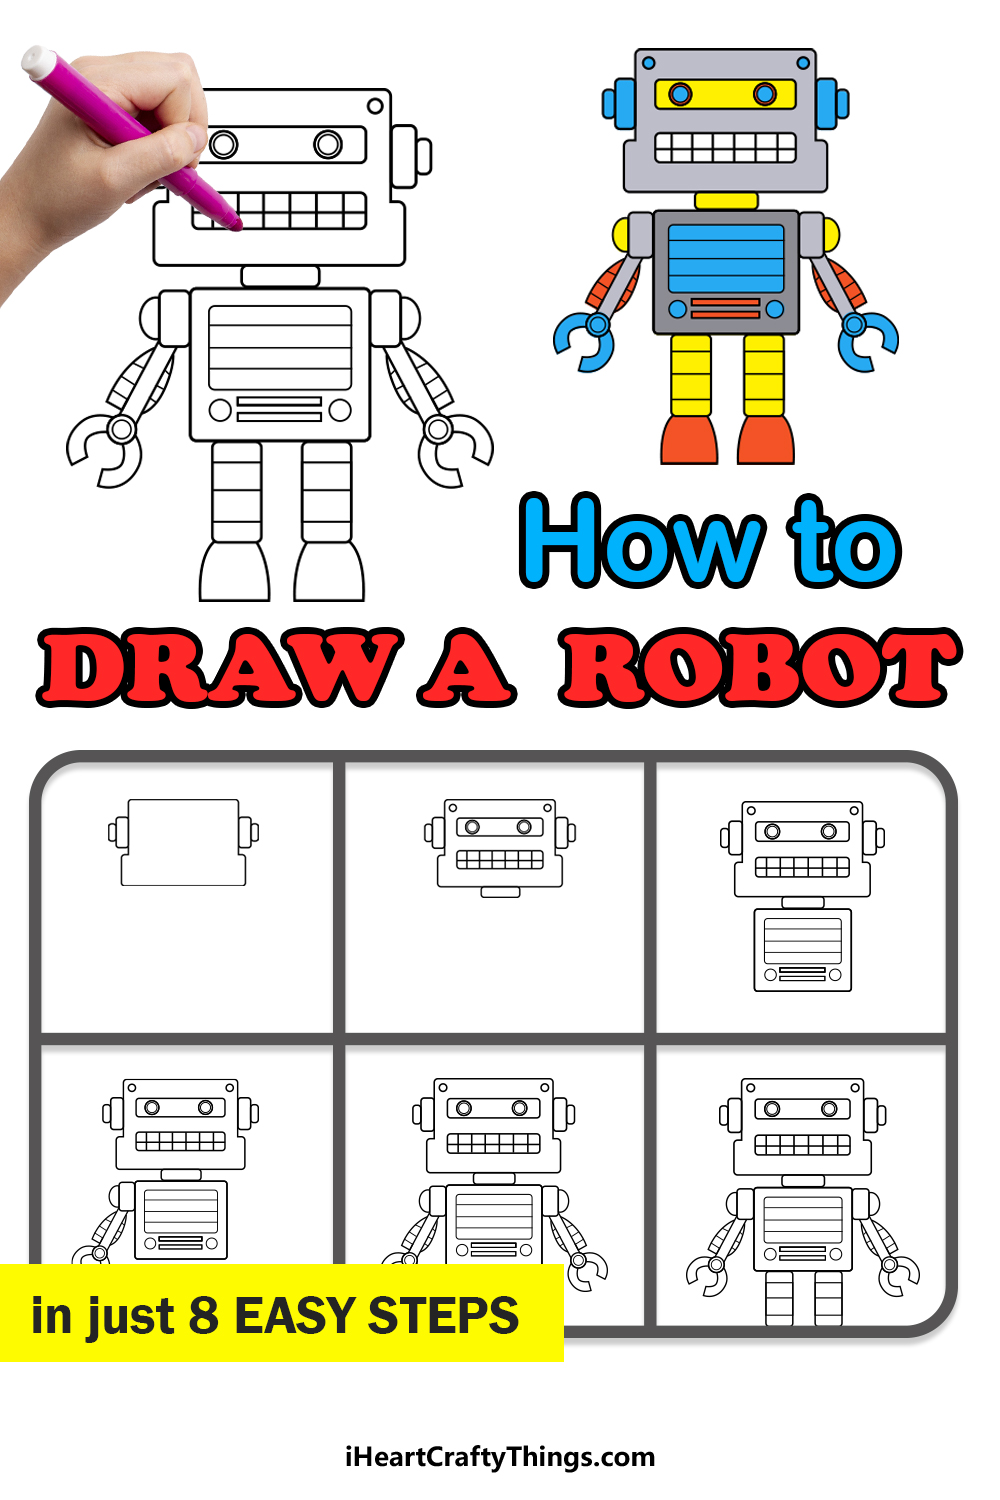
This bit-by-bit guidebook on how to draw a automaton in just 8 steps will have you drawing a cunning automaton buddy in no time .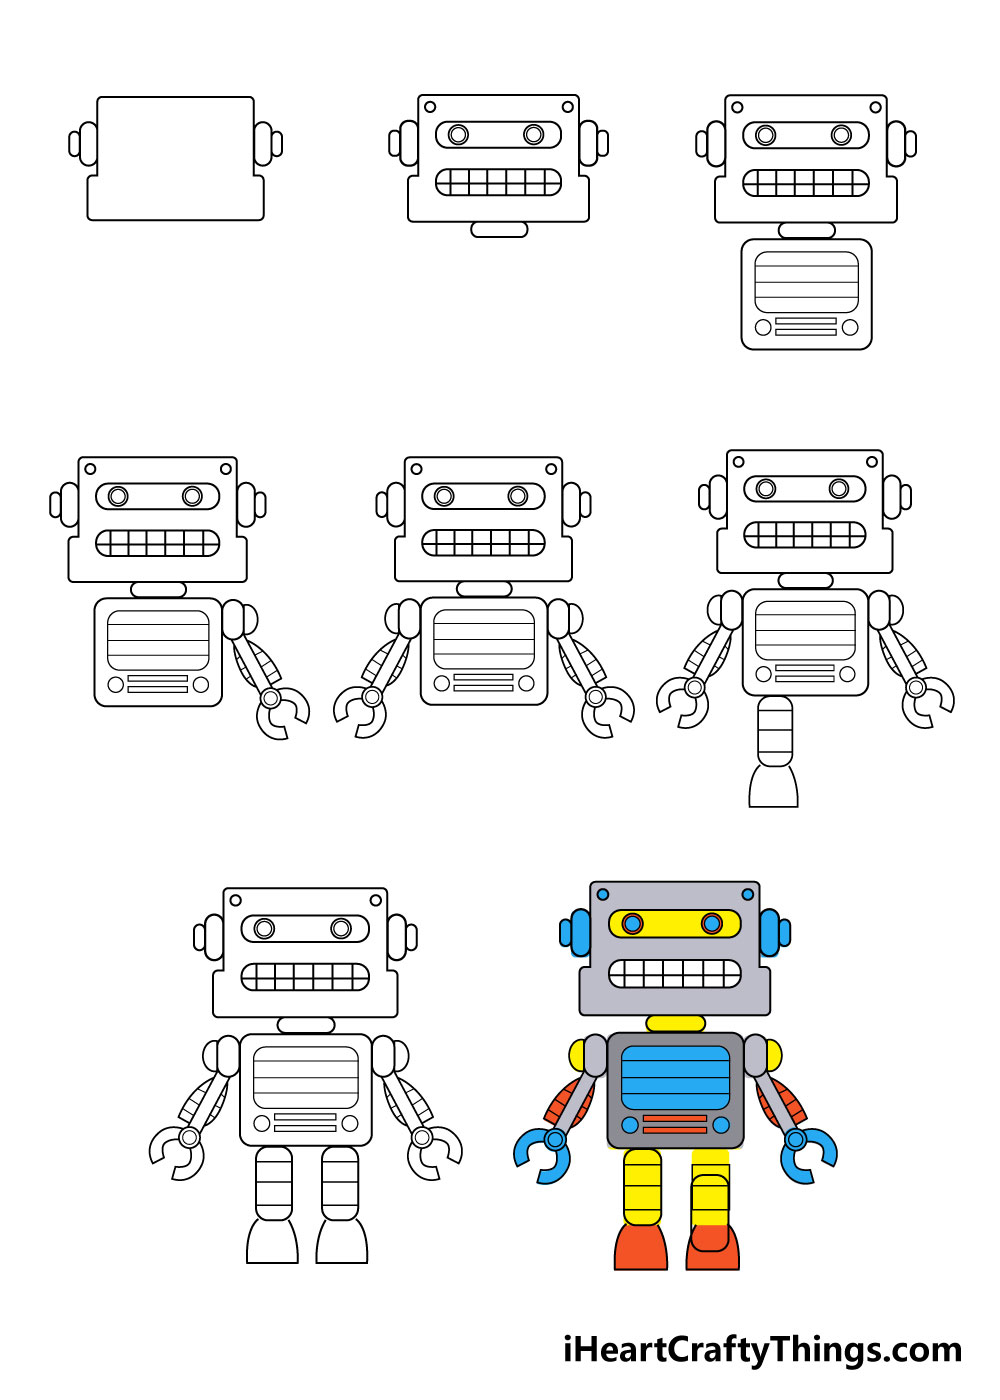
How to Draw A Robot – Let ’ s get Started !
 gradation 1
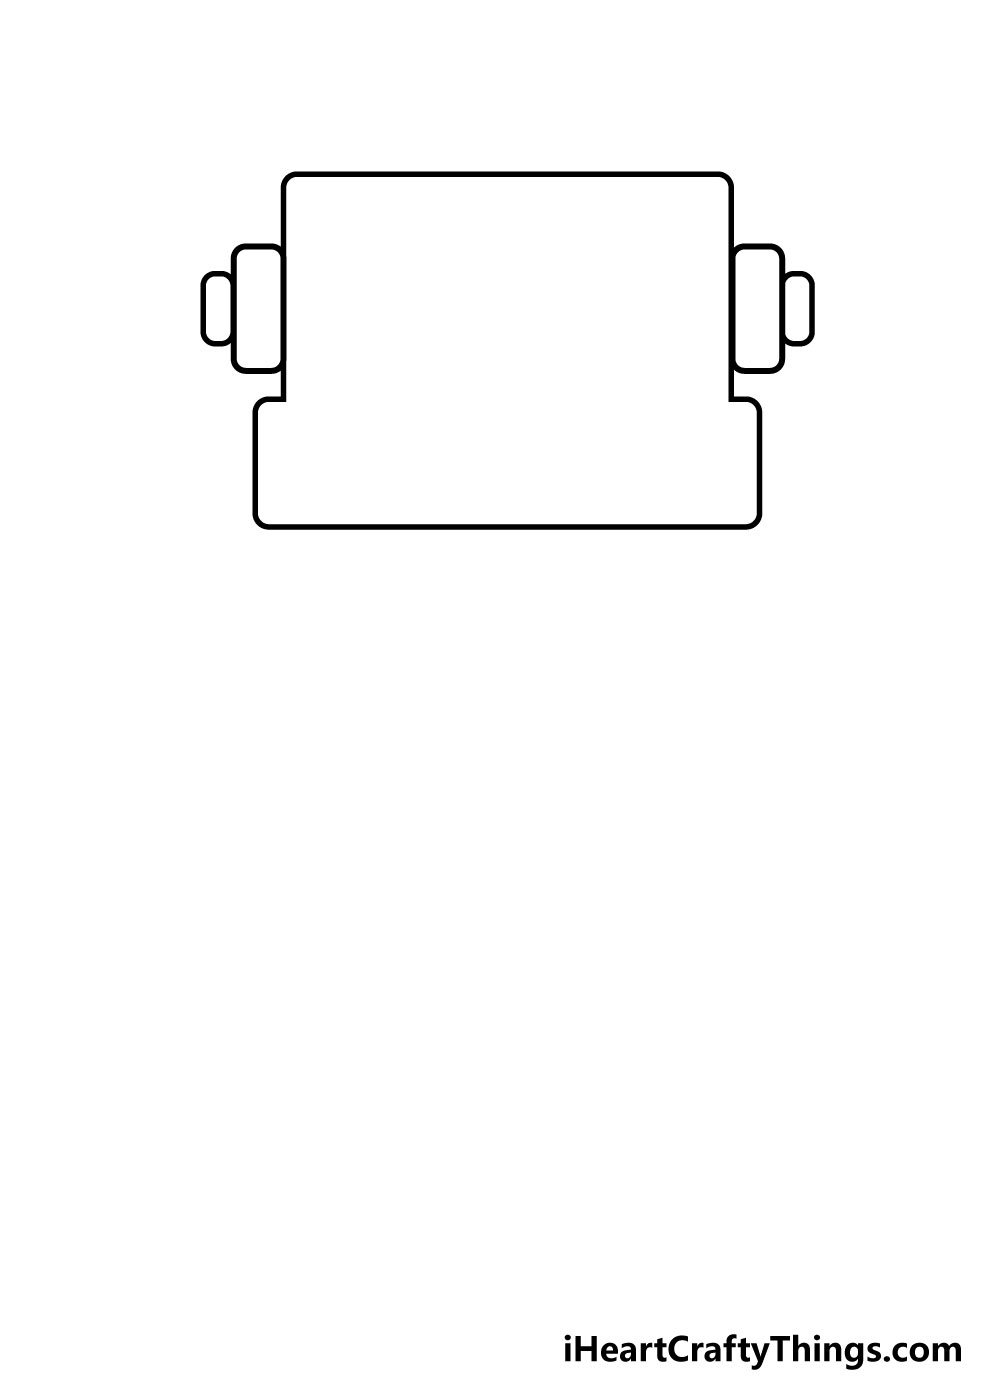
For this guide on how to draw a automaton, it will be very helpful for you to have a rule on hand, as there will be many straight lines in this guide .
To get started, just draw a square shape that looks like a squarely atop a rectangle with no credit line dividing them .
then, draw two rectangles on each side of the head as they appear in the address picture .
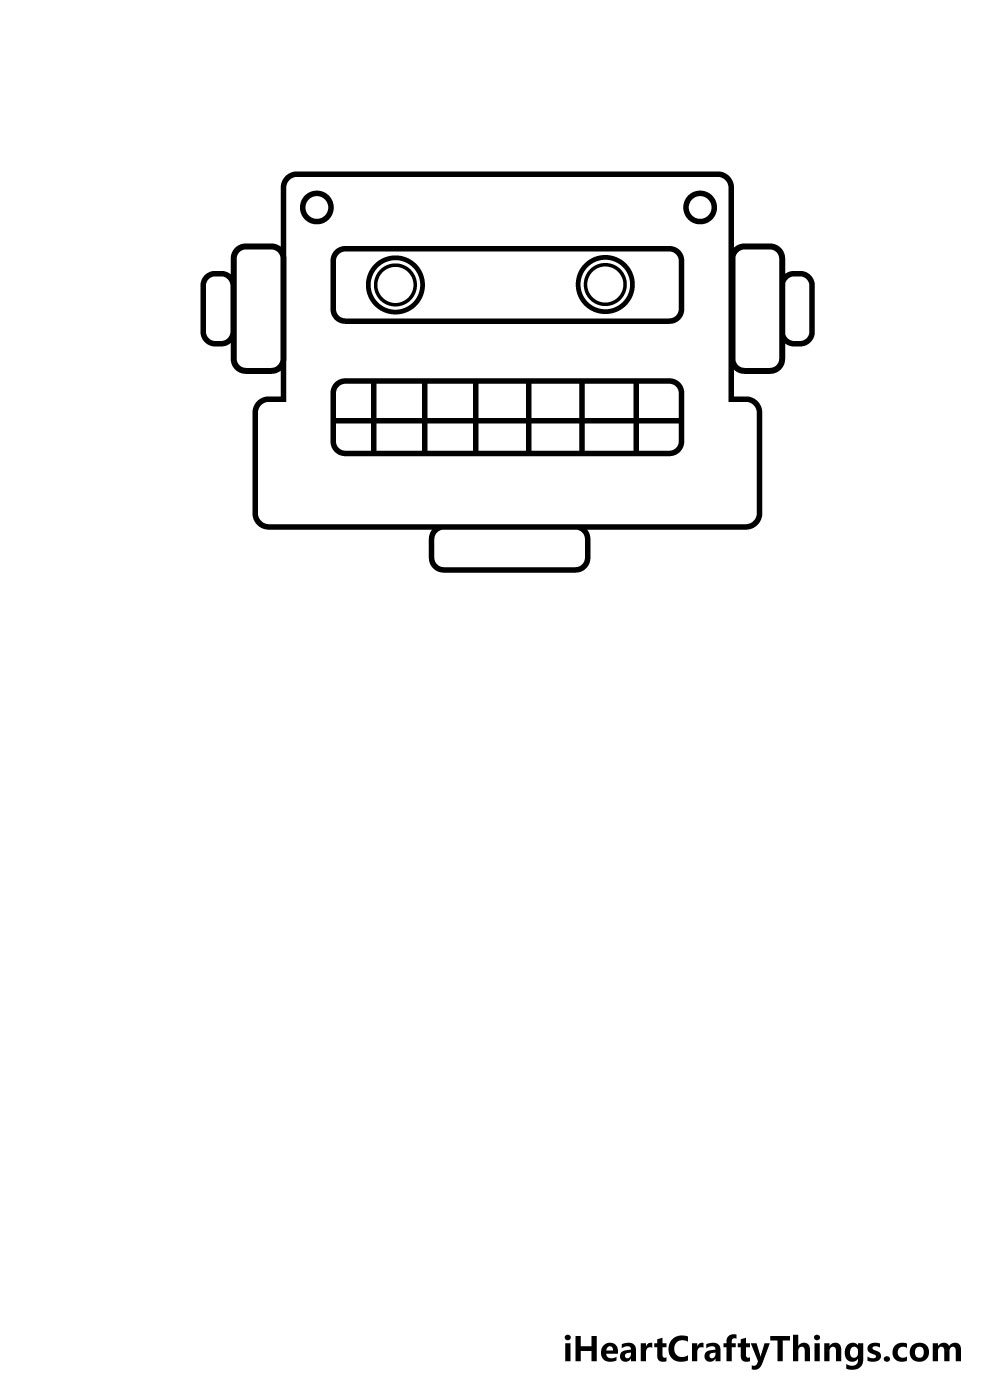 step 2 – Next, draw a font for your automaton
In this step of your automaton draw, we shall design a face for your automaton. For the mouth, simply draw a rounded rectangle, then draw a line grid within it to make teeth that look like rows of lights or buttons .
then, draw a rectangle above this to surround the eyes, which you can draw with some circles. You can besides add some extra circles above the center sphere for some extra details to very finish off this gradation .
 pace 3 – nowadays, draw a body for your automaton
We shall draw the body for your word picture in this third step of our lead on how to draw a automaton. First, draw a small, flat rectangle to form the neck of your automaton .
then, you can draw a square for the body .
once you have the outline for the torso, you can draw some playfulness details to it. You can do this by drawing a rectangle inside the body with some lines inside of it with some circles a well .
These kinds of details will make it look like your automaton is covered in lights and buttons !
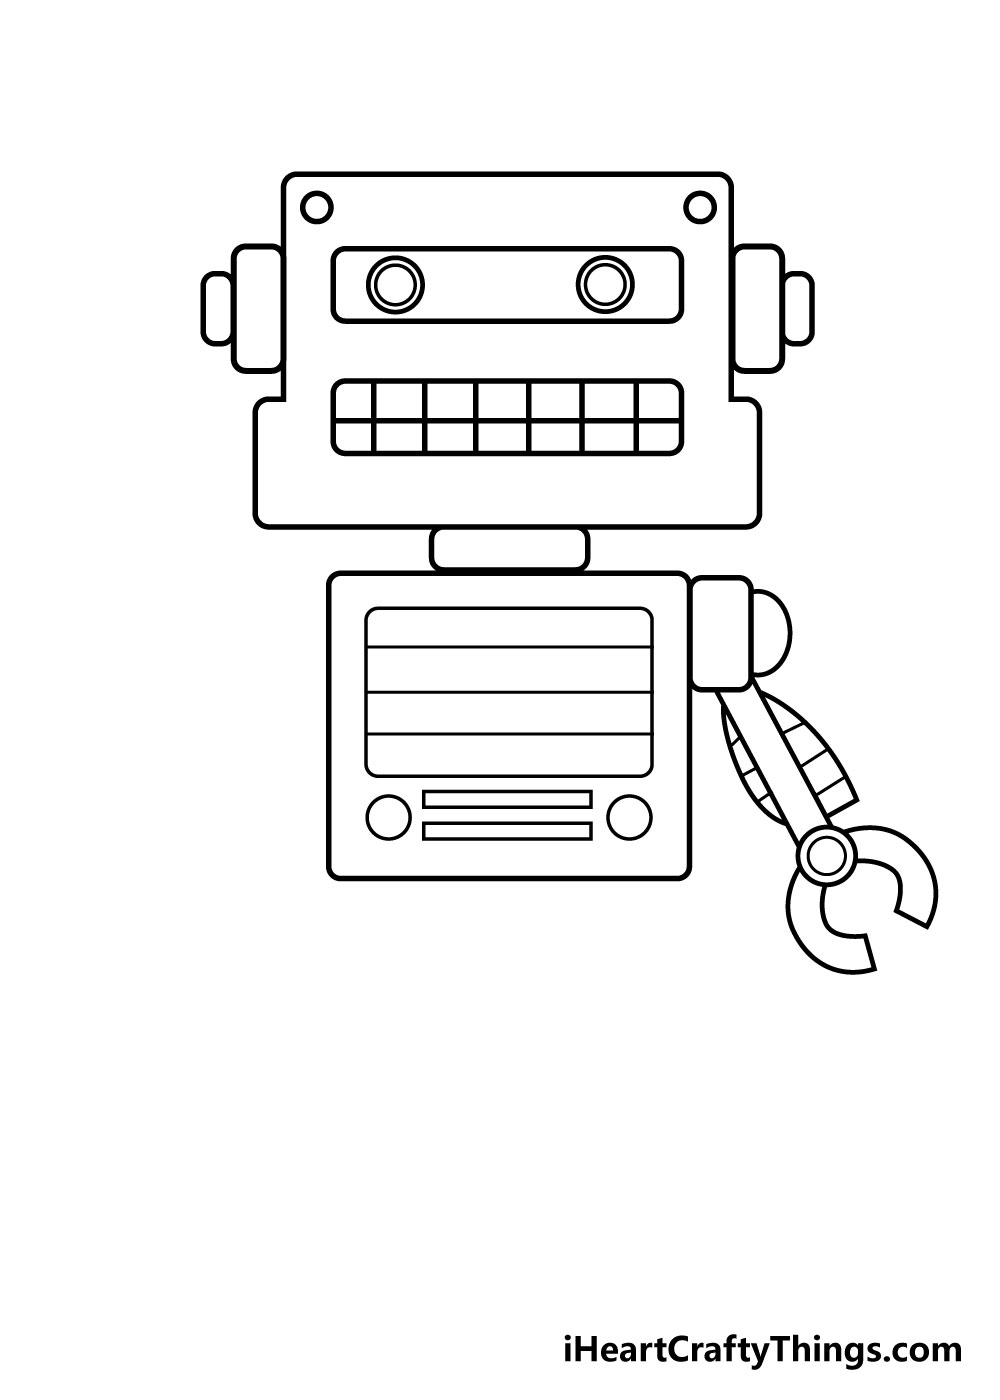 step 4 – Next, draw the first arm
Your automaton drawing needs some limbs, so we shall start to draw some in this step. As you can see in the reference image, the sleeve will be made from several different shapes .
For your automaton draw, you can besides add or remove details to or from the sleeve to suit the purpose that you would like .
differently, if you do follow the guidebook then the weapon will be made up of lots of true, square lines with some claw shapes for the hands .
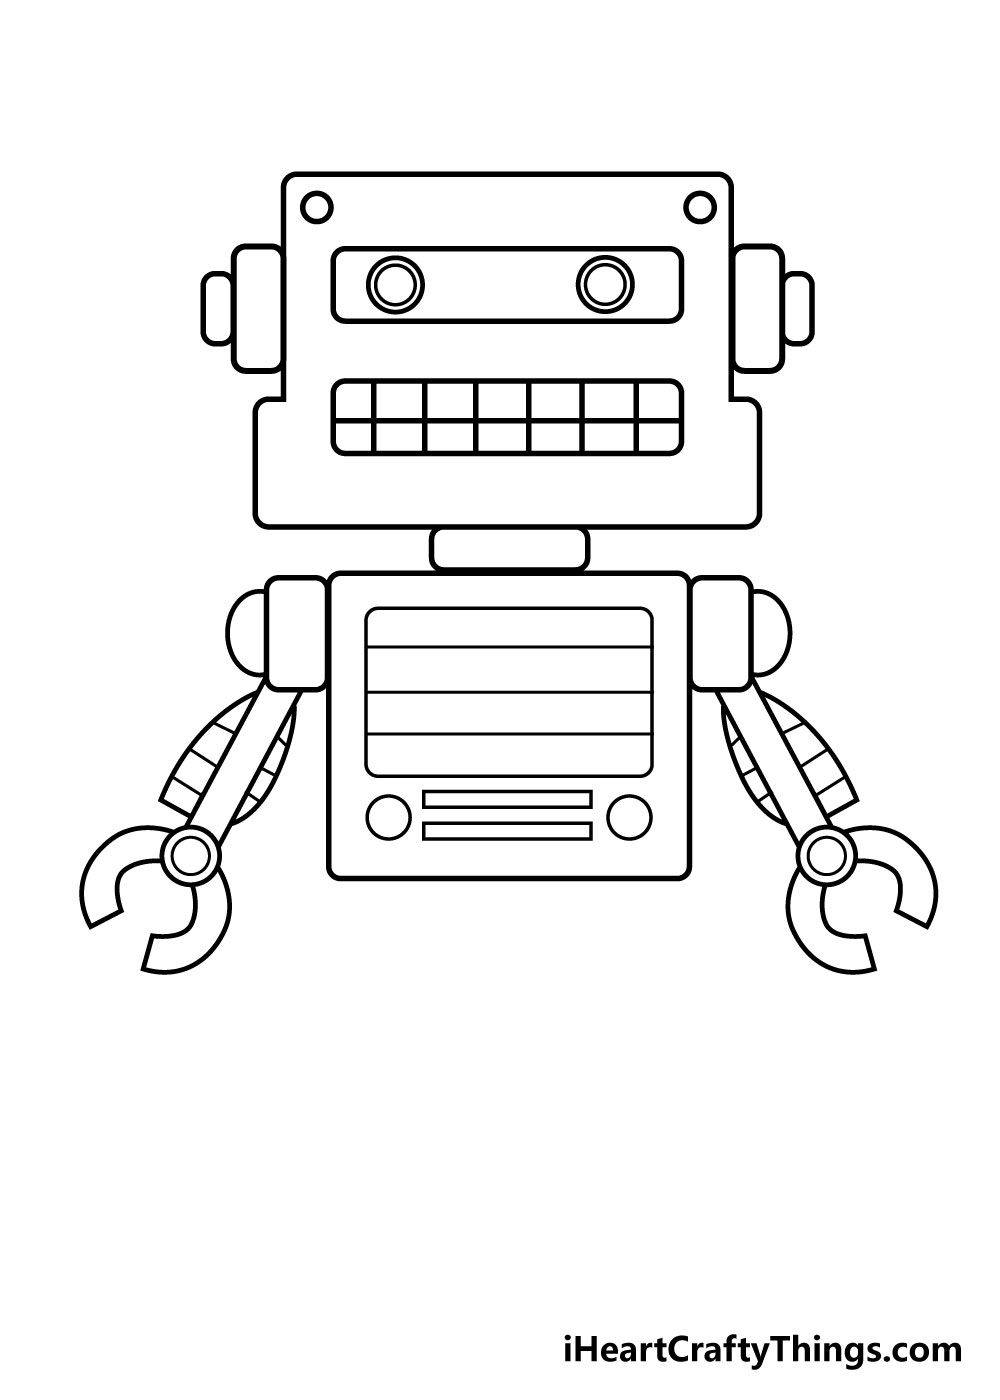 step 5 – now, draw the early arm
In step 5 of our template on how to draw a automaton, we will be replicating what we did in the previous one.
Read more: Tyrell Wellick
You could besides change the angle of it if you would like to make it look like your automaton is waving !
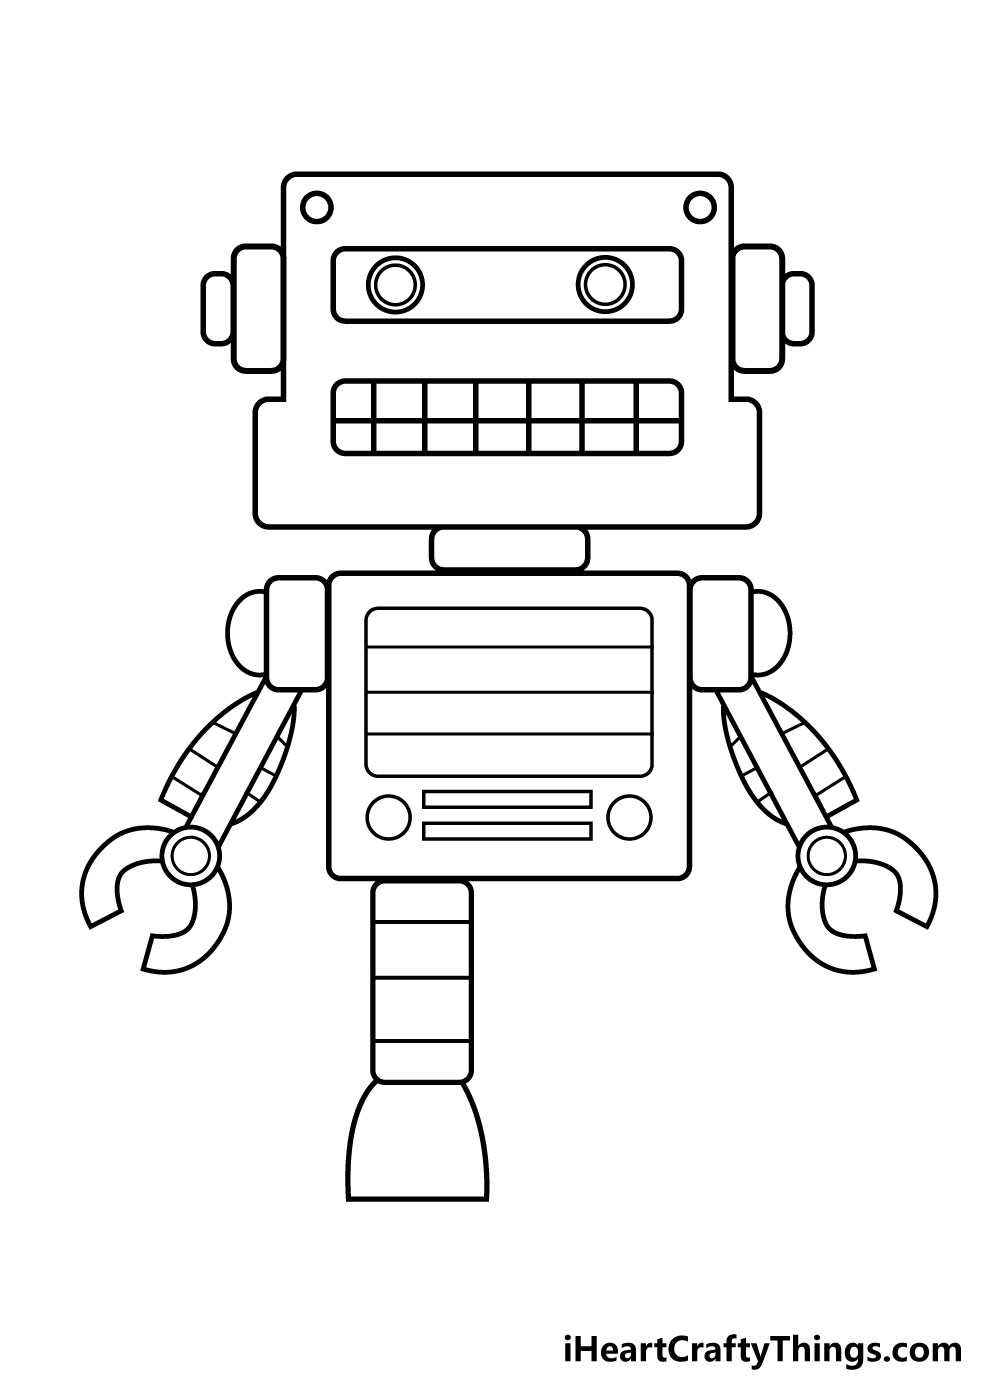 dance step 6 – Draw the first stage of your automaton
You have some arms for your automaton pull, sol for this tone let ’ s add the first base leg. We have a childlike design for the leg that is made from a rectangle with a round human body at the end for a foot .
You can draw some lines across the stage part to make the leg front bendy .
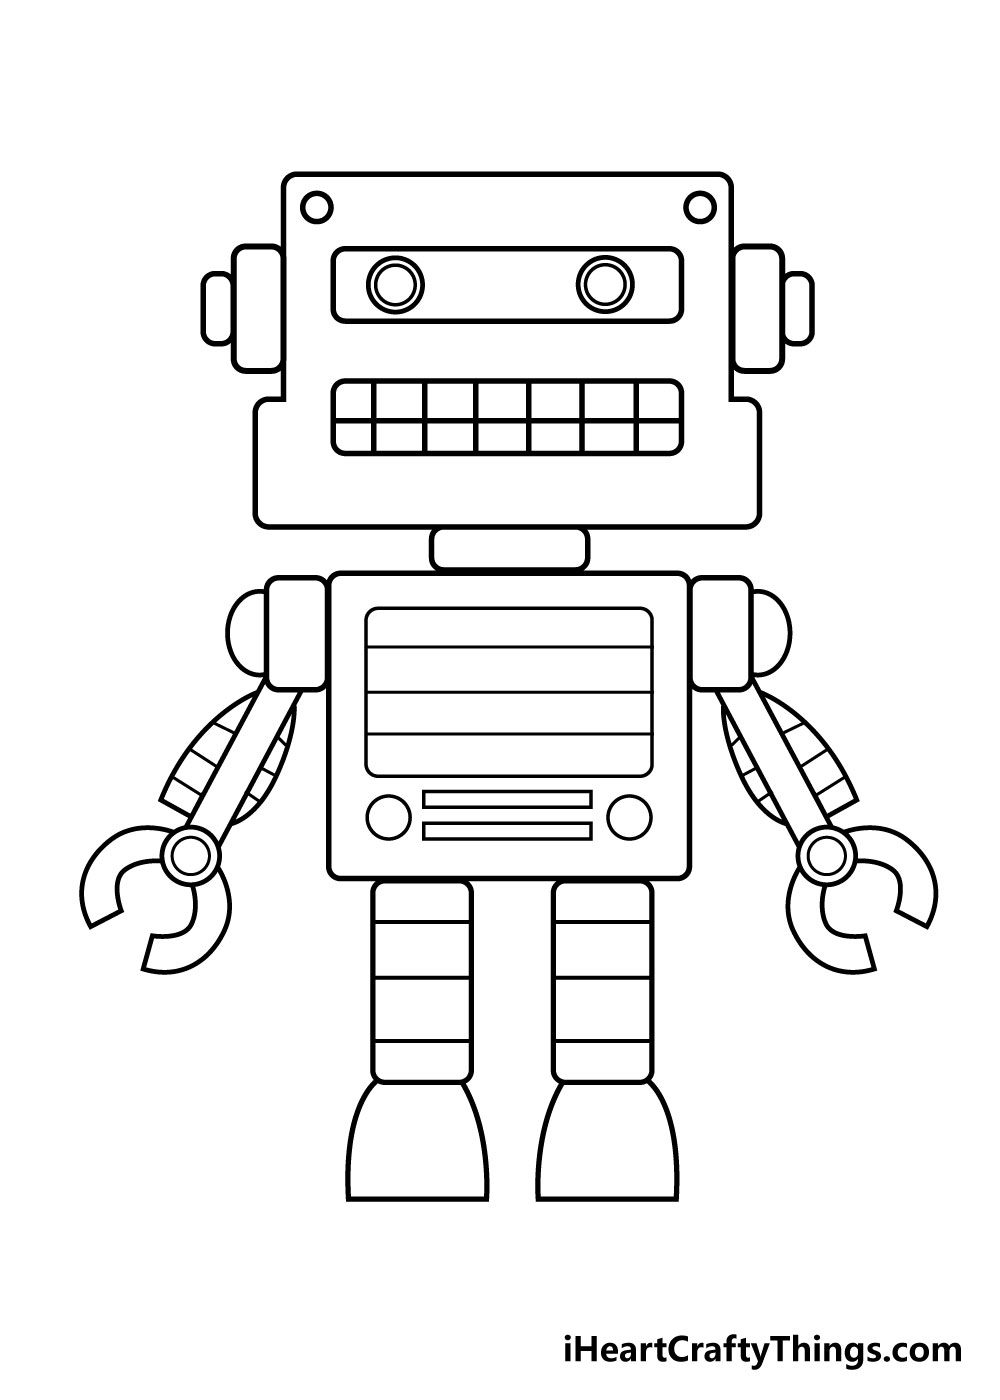 step 7 – Next, draw the other leg
You ’ ve draw one leg, so now you can draw the other one in this step of this guide on how to draw a automaton. Simply replicate the design of the other foundation to have the automaton standing on its own two feet .
With all the limb draw, you can move on to the final examination step. Before you do, be certain to draw any final examination details that you think would suit your automaton drawing .
What fun details do you think would look adept for your automaton ?
You could truly use your resource and wholly change the design of the peg if you wanted to !
possibly this automaton uses a giant spring or hovering engineering rather of legs. How do you think that this automaton would get around if it existed in real number life ?
 tone 8 – now finish off your automaton with some color
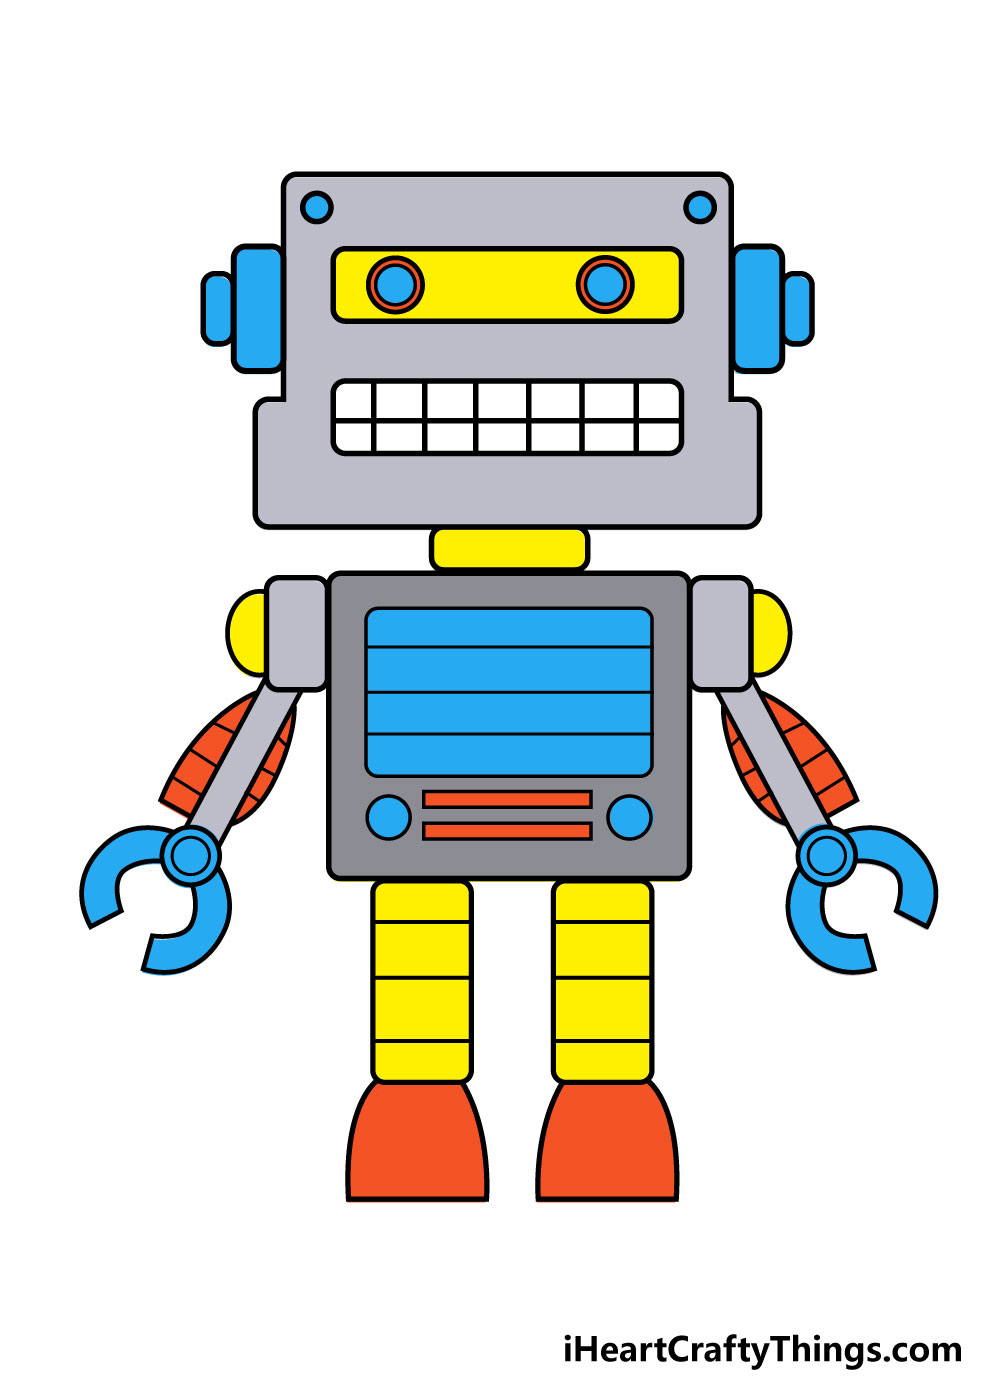
You ’ ve successfully drawn your automaton, thus now you can have some fun coloring it in ! This is a step where you can actually get imaginative with your color choices .
We ’ ve shown you how we would color in this cunning automaton, but this is your chance to show off all of your front-runner colors to finish off your drawing .
I think that the angry and wackier the colors are the better it will be for your automaton draw ! If I were coloring this in, I would use lots of color pens and markers for some amazing color brightness to this double .
Which art mediums and undimmed colors will you use to finish off your amazing artwork ?
Your Robot Drawing is dispatch !
We actually hope that you had an amazing time working through this bit-by-bit guide on how to draw a automaton ! We aimed to create a scout that showed you how to draw this automaton in a way that besides leaves a draw of room for you to show off your creativity .
now that you have drawn this automaton, you can have lots of fun changing it up to create your own unique one ! possibly you could give it a conveyer belt belt out for legs or create a balmy raygun for it to hold.
The possibilities for your creativity are dateless, and we ’ ra surely to see lots of playfulness and imaginative designs .
The drawing playfulness doesn ’ thymine have to end hera, though. We bring out new bit-by-bit guides constantly on our web site, indeed be surely to check in frequently to catch each new one as it comes out .
We would besides love to see your incredible automaton drawing once it ’ sulfur done ! You can let us see what a great job you did by sharing your drawing on our Facebook and Pinterest pages for us to admire .