Destiny 2: Forsaken campaign walkthrough
A bit-by-bit steer for every mission and boss competitiveness in the Destiny 2 : Forsaken campaign .
fortune 2 : abandon is here, and players everywhere are readying their weapons and preparing to take their retaliation against Uldren Sov. The crusade will take players to the Reef – and for some of us, spinal column to it – where they ’ ll be embarking on an epic poem venture to honor a fall champion, Cayde-6. There are going to be a few points where the path ahead international relations and security network ’ deoxythymidine monophosphate quite clear, so let us show you the way in our destiny 2 : Forsaken campaign walkthrough .
Destiny 2: Forsaken campaign walkthrough
The Destiny 2 : Forsaken crusade is anywhere between 6 and 12 hours long, depending on how well-prepared some players are for the increase Power level. The late-game campaign missions are Power 460, then expect to spend some time farming the Heroic Public Events on The Tangled Shore to bump those numbers up .
Last Call – Power 330
Fight aboard Cayde-6 to help Petra Venj regain control of the dangerous Prison of Elders .

The first campaign mission in Destiny 2 : Forsaken is “ last Call ”. This mission tasks players with heading to the Reef to help Cayde-6 and Petra Venj softwood with a prison carouse. Everything is reasonably heterosexual : kill enemies and advancement through the mission. At one point, players will need to help Cayde-6 by clearing Hive debris out of security systems – attend for the modules rising out of the floor, shoot the Hive debris to clear it .
After clearing the debris, continue through the prison, quelling the riot. Once the mid-mission cutscene plays, descend down into the lower levels of the prison, kill the abomination, and prepare for what comes next .
once the cutscene ends, hark back to the Tower and speak with Ikora and Zavala about what to do .
High Plains Blues – Power 340
Search the Tangled Shore for Cayde ’ mho killers .

The second deputation in the Destiny 2 : Forsaken campaign sends players out to the Tangled Shore, a new sphere overrun with all kinds of enemies. Begin walking around the directly tableland until Ghost gives a path to follow. Continue deeper into the Tangled Shore and work with the newly allies to clear the area before meeting Spider .
Spider will not give any more data until the player completes 5 of his bounties. Acquiring a bounty is equally simple as speaking with Spider and purchasing the lower line of bounties : Tangled Shore Bounties ( note that the “ Wanted Bounties ” do not count ) .
With the 5 bounties completed, speak with Spider to receive more information on Uldren and his Barons. spill with Petra Venj and Spider once more to learn that Petra will locate Uldren while you track down the Barons .
Scorned – Power 360
Follow Spider ’ s tips to the reject Barons ’ hideout and revenge Cayde-6 .

The third campaign mission in Destiny 2 : Forsaken introduces all the Barons players will be facing on their hunt for vengeance. head to the Barons ’ hideout and fight through the warren, encountering each Baron along the way. After fighting them all, render and speak to Spider, and then Petra Venj to report on what was found .

Because all the Barons escaped, players will need to hunt them down one at a time by completing six adventures on The Tangled Shore. These adventures range in their Power level recommendations from 390 to 440, indeed come organize. A team of Guardians should have no trouble clearing this with a 40-point deficit, but solo players should try to be at least 10 power in range .
- Target: The Rider – Power 390
- Target: The Trickster – Power 400
- Target: The Mad Bomber – Power 410
- Target: The Hangman – Power 420
- Target: The Mindebender – Power 430
- Target: The Rifleman – Power 440
With the survive of the six Barons all in, return to Spider and speak with him, along with Petra Venj for leads on the last two Barons, The Machinist and The Fanatic.
Read more: How to enable Voice Chat in Roblox?
The Machinist – Power 450
Battle across the toxic wastelands to take down the despised Baron known as the Machinist .

This one-fourth Destiny 2 : Forsaken crusade deputation tasks players with hunting down The machinist, the right-hand handmaid of The Fanatic. Follow the waypoint into the toxic industrial area where players will be able to repair a tank by carrying spare parts spinal column to the break chassis for Ghost to fix. Use the tank to blast open doors and competitiveness through to The Machinist .

Taking down The machinist can be a bite challenging for players below the commend Power level as she has quite a few high-damage abilities. The battle takes place in a boastfully sphere filled with toxic puddles, so be careful not to stand in them for besides long. Avoid the missile barrages, continue to damage her when possible, and keep move .
once The Machinist is killed, speak with Petra Venj concerning the whereabouts of Uldren Sov. Next, speak with Spider to hear more about the Watchtower .
Nothing Left to Say – Power 460
Climb the Watchtower to stop Uldren and the Fanatic .
The one-fifth and final examination mission in the Destiny 2 : Forsaken political campaign is a drawn-out and difficult quest. This missions takes players to the mysterious Watchtower of the Awoken where they ’ ll face The Fanatic, Uldren, and some ineffable Eldritch horror .

Upon reaching the Watchtower, players will need to fight The Fanatic in two arenas, outside in a medium-sized court and at heart in a cramp and close anteroom. The chief thing to look out for during this fight is The fanatic ’ randomness boastfully electric attack which he telegraphs by marking a large area and darkening the screen of anyone standing inside. Simply run out of the r-2 to avoid the one-hit kill area-of-effect abilitiy. Be mindful of his laser-like attack and the minions he summons to help .
With The Fanatic defeated, continue through the versatile levels and dimensions of the Watchtower, killing Taken along the way. At the top of the tower, players will face the Chimera, Voice of Riven .
Chimera, Voice of Riven
The fight against the Chimera, Voice of Riven, is exceptionally difficult for any player who is not at the correct Power level. In the consequence the enemies have a skull beside their health barroom, go and spend some time acquiring better gear .
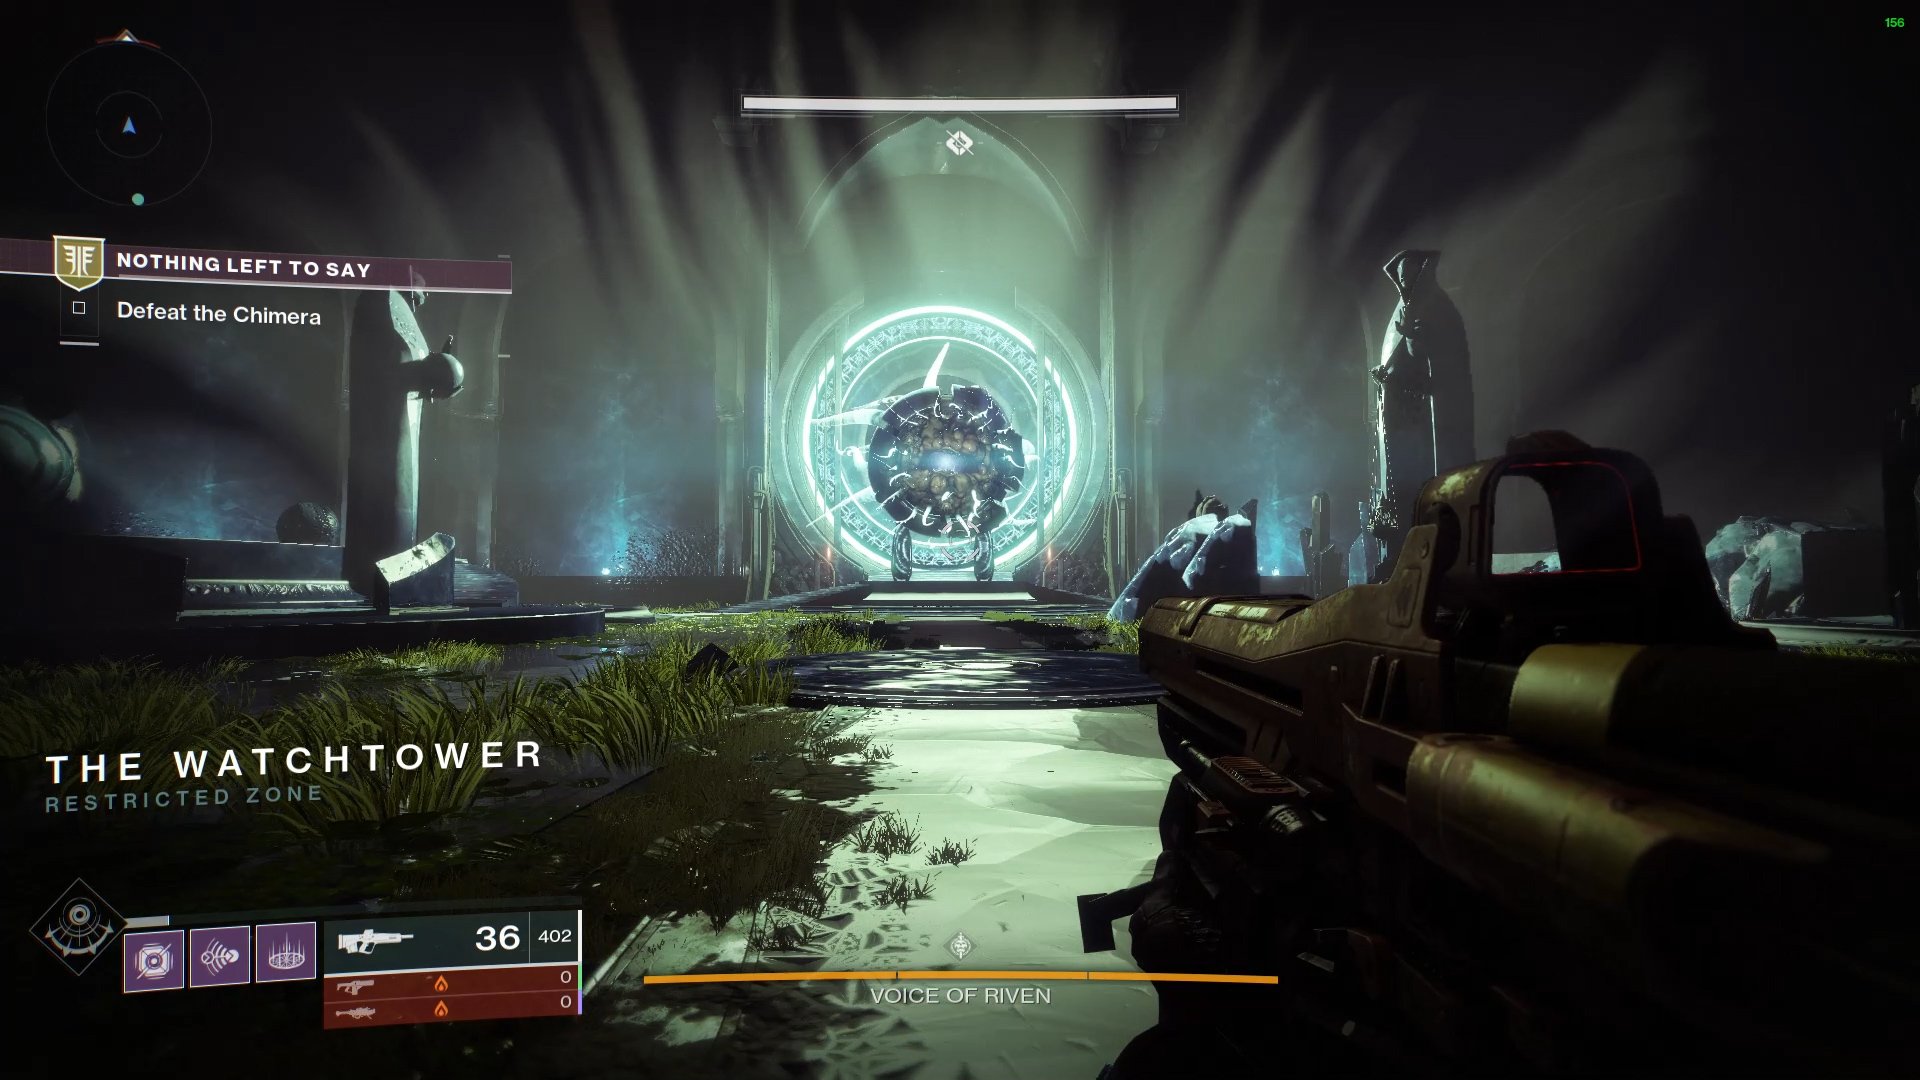
There are three stages to the competitiveness against the Voice of Riven, as indicated by the boss ’ health measure. Every incision of the bar that gets removed, players will be teleported to an Ascendant Plane to defeat an Ascendant Plane Guard, at which decimal point a portal site will open, allowing them access back to the independent fight. During the Ascendant Plane phase, be careful not to stand in the black mariner for besides hanker, as it will continually damage you – the like holds dependable for the grind during the main party boss crusade .
Toward the end of the contend, the Chimera, Voice of Riven, will summon orb around the board which tether to it, rendering it wholly immune to all damage. Locate and destroy this eyeball to be able to damage the boss further .

A good scheme is to stand at the back of the room, keeping the pillars between the boss and the actor. The lone problem with this is that players will need to watch out for the eyeball the Voice of Riven shoots, as these softwood massive wrong, potentially one-hitting some gloomy Power players. Focus on clearing out the enemies and dealing with the orbs, before switching focus to Voice of Riven .
Make dependable use of grenades and long-range Supers to deal damage to the boss without having to get up close. Any weapon apparatus will work for this fight, though obviously some Power weapons like Sleeper Simulant and Whisper of the Worm will make light knead of the Chimera .
once the Voice of Riven dies, revert to the Tower and speak with Zavala and Ikora. once the two remaining Vanguard have said their piece, go to the Tangled Shore and talk with Petra Venj to receive a Broken Awoken Talisman. Spider will want to speak with you after receiving this amulet, at which point the quest, Key of Light and Darkness, will begin.
Read more: How to enable Voice Chat in Roblox?
With Cayde-6 avenged, the Barons frustration, and Prince Uldren Sov manage with, players will be free to continue their journey through Destiny 2 : Forsaken. There ’ second more to go, as the last wish foray into lies ahead, as does the farseeing path to Power 600. Check out the Shacknews Destiny 2 Complete Strategy Guide for more abandon coverage !

Sam Chandler
Guides Editor
Hailing from the nation down under, Sam Chandler brings a snatch of the southern hemisphere flair to his ferment. After bouncing round a few universities, securing a bachelor degree, and entering the video game industry, he ‘s found his new family here at Shacknews as a Guides Editor. There ‘s nothing he loves more than crafting a steer that will help person. If you need help with a guidebook, or notice something not quite right, you can Tweet him : @ SamuelChandler